Saturday, December 29, 2007

Server.MapPath Method

If you need to go to a file from your page, you may need to know the exact file path in order to access to it. In this case, you can use Server.MapPath method.

Server.MapPath method takes a path as a parameter and returns the physical path corresponding to the path.

For example, there is an xml file (database.xml) which stored a list of connection string is located in the C:\inetpub\wwwroot\webapplication1\database directory, and you need to get the connection string to connect to an appropriate database. The C:\inetpub\wwwroot directory is set as the web root directory.

The script uses the slash character to specify that the path returned should treated as a complete virtual path on the server and mapped from the root folder.
string path = Server.MapPath(“/webapplication1/database/database.xml”)
This script will output as the following:
C:\inetpub\wwwroot\webapplication1\ database\database.xml
If the passed parameter does not start with a slash character, it will map to its current directory, in this case will be C:\inetpub\wwwroot\webapplication1.
string path = Server.MapPath(“database/database.xml”)
This will produce the same result.

Below are some tricks on Server.MapPath method.

' the current directory
currDir = Server.MapPath(".")

' the parent directory
parentDir = Server.MapPath("..")

' the application's root directory
rootDir = Server.MapPath("/")

Friday, December 28, 2007

List of Parameters Supported by Windows Media Player 7 and Later Version


By adding some PARAM elements in your Windows Media Player object, you can decide the outlook and the functionality of your Windows Media Player. It enables you to specify certain player properties when the page is browsed. Below is a list of common parameters supported by Windows Media Player and later version.


  1. autoStart
    • Default: true
    • Description: Specifies or retrieves a value indicating whether the current media item begins playing automatically.

  2. balance
    • Default: 0
    • Description: Specify the current stereo balance.

  3. baseURL
    • Default: -
    • Description: Specifies the base URL used for relative path resolution with URL script commands that are embedded in media items.

  4. captioningID
    • Default: 0
    • Description: Specifies the name of the element displaying the captioning.

  5. currentMarker
    • Default: 0
    • Description: Specifies the current marker number.

  6. currentPosition
    • Default: 0
    • Description: Specifies the current position in the media item in seconds.

  7. defaultFrame
    • Default: -
    • Description: Specifies the name of the frame used to display a URL.

  8. enableContextMenu
    • Default: true
    • Description: Specifies a value indicating whether to enable the context menu, which appears when the right mouse button is clicked.

  9. enabled
    • Default: false
    • Description: Specifies whether the Windows Media Player control is enabled.

  10. filename
    • Default: -
    • Description: Specifies the name of the media item to play. You can specify a local filename or a URL.

  11. fullScreen
    • Default: false
    • Description: Specifies whether video content is played back in full-screen mode.

  12. InvokeURLs
    • Default: true
    • Description: Specifies a value indicating whether URL events should launch a Web browser.

  13. Mute
    • Default: false
    • Description: Specifies if audio is muted.

  14. Loop
    • Default: false
    • Description: Specifies if audio is played continuously.

  15. PlayCount
    • Default: 1
    • Description: Specifies the number of times a media item will play. Minimum value of one.

  16. Rate
    • Default: 1.0
    • Description: Specifies the playback rate.
      0.5 equates to half the normal playback speed, 2 equates to twice.

  17. stretchToFit
    • Default: false

    • Description: Specifies whether video displayed by the control automatically sizes to fit the video window, when the video window is larger than the dimensions of the video image.

  18. uiMode
    • Default: full

    • Description: Specifies which controls are shown in the user interface. Possible values: invisible, none, mini, full.

  19. URL
    • Default: -
    • Description: Specifies the name of the media item to play. You can specify a local filename or a URL.

  20. volume
    • Default: Last setting
    • Description: Zero specifies no volume and 100 specify full volume.

  21. windowlessVideo
    • Default: false
    • Description: Specifies or retrieves a value indicating whether the Windows Media Player control renders video in windowless mode.
      When windowlessVideo is set to true, the Player control renders video directly in the client area, so you can apply special effects or layer the video with text.
      Supported by Windows Media Player for Windows XP or later.

Thursday, December 20, 2007

Template Column VS Bound Column

This post will explain how to get information from your data grid for Template Column and Bound Column. There is so many times that when I am trying to retrieve the value of certain column from a data grid, I can get the value of the first column (Bound Column). However, I cannot get the value of the second column (Template Column). And both of the columns are not empty though.

The explanation below is what I had found out finally.

Basically, the difference between BoundColumn and TemplateColumn is that you have more control over what and how things are rendered in TemplateColumn. For example, you can decide what controls are used when editing. With Bound Column creates column bound to a field in the data source and rendered in a table cell. You can use a cell’s Text property to get whatever text is there. But please note that this only works for Bound Column.

Here is a sample of HTML code:
<asp:BoundColumn DataField="COUNTRY" HeaderText="Country">
    <HeaderStyle Font-Size="11px"></HeaderStyle>
    <ItemStyle Font-Size="10px"></ItemStyle>
</asp:BoundColumn>

<asp:TemplateColumn HeaderText="Address">
    <HeaderStyle Font-Size="11px"></HeaderStyle>
    <ItemStyle Font-Size="10px"></ItemStyle>
    <ItemTemplate>
        <%# Container.DataItem("ADDRESS")%>
    </ItemTemplate>
    <EditItemTemplate>
        <asp:Label id="lblAddress" Text='<%# Container.DataItem("ADDRESS")%>' Runat="server"></asp:Label>
    </EditItemTemplate>
</asp:TemplateColumn>

From the HTML code as above, as you can see, the first bound column will bind the “COUNTRY” columns to its data field, while the second template column will use a Label control to bind the value into it.

Protected Sub GetColumnValue()
    'Bound Column... works
    Label1.Text = e.Item.Cells(0).Text

    'Template Column...doesn't work
    
Label2.Text = e.Item.Cells(1).Text
End Sub


This is because .NET sees the contents inside the Bound Column as Text and the contents inside the Template Column as a DataBoundLiteralControl (a collection of server controls).

So, to get the value of the second column, you would have to access the DataBoundLiteralControl’s Text property by using FindControl method. Here is the sample code:
Protected Sub GetColumnValue()
    'Bound Column...works
    Label1.Text = e.Item.Cells(0).Text

    'Template Column...works
    Label2.Text = CType(e.Item.FindControl("lblAddress"), Label).Text
End Sub

Tuesday, December 18, 2007

Hiding and Showing Columns in the Data Grid

Some programmers have face the problem controlling the visibility of certain column in the Data Grid control. In this post, I will show you how to hide and show certain column in the data grid.

Data grid control has a property called AutoGenerateColumns. By default, its values is set to True, which will contain all of the column names of the data set as you bind it with the data set. If you set the AutoGenerateColumns to True, then you would not be able to control the visibility of the columns.

You can either use asp:BoundColumn or asp:TemplateColumn. For asp:BoundColumn, you need to specify the HeaderText and its DataField. Here is a tiny part of html sample code:
<asp:BoundColumn DataField="COUNTRY" HeaderText="Country">
    <HeaderStyle Font-Size="11px" >
    </HeaderStyle>
    <ItemStyle Font-Size="10px" >
    </ItemStyle>
</asp:BoundColumn>

<asp:BoundColumn DataField="ADDRESS" HeaderText="Address">
    <HeaderStyle Font-Size="11px" >
    </HeaderStyle>
    <ItemStyle Font-Size="10px" >
    </ItemStyle>
</asp:BoundColumn>

Or with asp:TemplateColumn, you need to specify its HeaderText and bind value into it. For example:
<asp:TemplateColumn HeaderText="Country">
    <HeaderStyle Font-Size="11px" >
    </HeaderStyle>
    <ItemStyle Font-Size="10px" >
    </ItemStyle>
    <ItemTemplate>
        <%# Container.DataItem("COUNTRY")%>
    </ItemTemplate>
</asp:TemplateColumn>

<asp:TemplateColumn HeaderText="Address">
    <HeaderStyle Font-Size="11px" >
    </HeaderStyle>
    <ItemStyle Font-Size="10px" >
    </ItemStyle>
    <ItemTemplate>
        <%# Container.DataItem("ADDRESS")%>
    </ItemTemplate>
</asp:TemplateColumn>

From the html sample code as above, now you can control the visibility of the columns easily. In your .aspx page, you can add in two buttons (btnShow and btnHide) and set OnClick event handlers to them which will do the work of hiding and showing the column “Address” in code behind file.
Private Sub btnShow_Click(ByVal sender As Object, ByVal e As System.EventArgs) Handles btnShow.Click
      dg.Columns(1).Visible = True
End Sub

Private Sub btnHide_Click(ByVal sender As Object, ByVal e As System.EventArgs) Handles btnHide.Click
      dg.Columns(1).Visible = False
End Sub

Here it is, a simple way to control the visibility of your data grid’s columns. Good luck.

Friday, December 14, 2007

Server.Transfer VS Server.Execute

Server.Transfer
Server.Transfer takes the control execution of the page to the new page and thereafter it doees not return to the original page. This execution happens at the server side and the client is unaware of the change, and hence it maintains the original URL.

Server.Execute
In Server.Execute method, a URL is passed as a parameter, and the control moves to this specified page. Execution of code happens on this specified page. Once the execution is over, the control will return to the original page.

This method is very useful if you want to execute something in a specified page, and then come back to the original page.

The URL in the browser also remains the original form's URL.

Wednesday, December 12, 2007

Server.Transfer VS Response.Redirect

Example: A webform1.aspx wants to send the user to webform2.aspx.

Response.Redirect
Response.Redirect method simply causes the client browser to move to another specified URL, as code below:
Response.Redirect(“webform2.aspx”)

When it is called, it will send a 302 (Object Moved) redirect header to the client browser, telling it that webform1.aspx has moved to webform2.aspx and then the browser will send a request to the server for webform2.aspx. When the browser receives responses from the server, it uses the header information to generate another HTTP request to the new URL.

For this method, the redirection happens at the client side, so it involves 2 round trips to the server: request the original page, and request for the redirected page.

When webform1.aspx is redirected to webform2.aspx, query string parameters in webform1.aspx are unavailable in webform2.aspx. If you want to pass value from webform1.aspx to webform2.aspx, you have to pass it either by query string parameters or store it in a Session object.

Since the client browser initiates another second request, so it is possible to redirect to an external site.


Server.Transfer
Server.Transfer method runs the execution for navigate from webform1.aspx to webform2.aspx on the server side, and sends the result to the client browser. When this method is been called, webform1.aspx terminates execution and the flow of control is transferred to webform2.aspx. The webform2.aspx still uses the response stream created by the webform1.aspx.

When you use this method to navigate between pages, Server.Transfer maintains the original URL on the browser, namely webform1.aspx, because the navigation occurs on the server side and the client browser remains unaware of the transfer. You can’t use Server.Transfer to send users to an external site since the execution is running on the server.

Server.Transfer has a second parameter called preserveForm. By default, it is set to false and does not pass the form data or the query string of the original page to the transferred page. But by set it to True, you can preserve them to the page that you are redirected to, as code below:
Server.Transfer(“webform2.aspx”, True)

For example, there is a textbox1 in webform1.aspx. With the preserveForm parameter set to True, you would be able to retrieve the value of textbox1 in webform2.aspx by referencing Request.Form(“textbox1”).

But be aware that when this method is been used, an error will occur in certain circumstances that attempting to transfer the form and query string values. The destination page uses the same response stream that was created by the original page, and therefore the hidden _VIEWSTATE field of the original page ends up on the second page, which may causes the ASP.NET machine authentication check (MAC) assumes that the ViewState of the new page has been modified on the client.

To resolve this problem:
1. Do not pass the second parameter (default is false) if it is unnecessary. When no query string or Form fields is been transferred to the destination page, ASP.NET does not run the MAC.
2. Set the enableViewstateMac property to True on the destination page, and then set it back to False.

Tuesday, December 11, 2007

Adding an embedded Windows Media Player on HTML document

This article describes how to embed Windows Media Player to play music or video in HTML document, it also includes required code in HTML and JavaScript.

To embed Windows Media Player, you need to add an OBJECT element for the Windows Media Player ActiveX control. Here is the code to add the OBJECT element on your web page.
<HTML>
<HEAD>
<TITLE>Embedded Windows Media Player Web Page</TITLE>
</HEAD>
<BODY>

<OBJECT ID="Player" width="320" height="240"
CLASSID="clsid:6BF52A52-394A-11d3-B153-00C04F79FAA6">
</OBJECT>

</BODY>
</HTML>

As you can see, there is a CLASSID number there. This CLASSID may differ depends on the Windows Media Player’s version. The CLASSID is for Windows Media Player 7, 9, 10 and 11. If you want to embed Windows Media Player 6.4 instead of the latest version, the class ID is clsid:22D6F312-B0F6-11D0-94AB-0080C74C7E95.

Add PARAM Parameters
Besides, you can decide the player’s functionality by adding some PARAM elements. It enables you to specify certain player properties when the page is browsed.

In this example, I had added in 3 parameters which let the media item begins playing automatically and non stop when the page is browsed point to the path of my music file.

<HTML>
<HEAD>
<TITLE>Embedded Windows Media Player 7 Control</TITLE>
</HEAD>
<BODY>

<OBJECT ID="Player" width="320" height="240"
CLASSID="clsid:22D6f312-B0F6-11D0-94AB-0080C74C7E95">
<PARAM name="autoStart" value="false">
<PARAM name="filename" value="your_song.wav">
<PARAM NAME = "loop" VALUE = "True">
</OBJECT>

</BODY>
</HTML>

Controlling Windows Media Player using Java script code
Here is a few examples of scripts to control Windows Media Player.
Start playback:
Player.controls.play();
Stop playback:
Player.controls.Stop();
Pause playback:
Player.controls.Pause();
Mute setting:
Player.settings.mute = “1”;
Unmute setting:
Player.settings.mute = “0”;
Volume up setting:
Player.settings.volumn = Player.settings.volumn + 10;
Volume down setting:
Player.settings.volumn = Player.settings.volumn – 10;

Here is the complete code of it. There is only Start and Stop button in this sample. Hope this will help you.

<HTML>
<HEAD>
<TITLE>Embedded Windows Media Player 7 Control<SCRIPT>
<!--
function StartPlay ()
{
Player.Controls.play();
}

function StopPlay ()
{
Player.Controls.stop();
}
-->
</SCRIPT>

</HEAD>
<BODY>
<OBJECT ID="Player" width="320" height="240"
CLASSID="clsid:22D6f312-B0F6-11D0-94AB-0080C74C7E95">
<PARAM name="autoStart" value="false">
<PARAM name="filename" value="your_song.wav">
<PARAM NAME = "loop" VALUE = "True">
</OBJECT>

<BR>
<INPUT TYPE="BUTTON" NAME="BtnPlay" VALUE="Play" OnClick="StartPlay()">
<INPUT TYPE="BUTTON" NAME="BtnStop" VALUE="Stop" OnClick="StopPlay()">

</BODY>
</HTML>

Note that if you are using version 6.4, you can change the two player methods. In the StartPlay() function change the method to Player.play(), and in the StopPlay() function to Player.stop().

Sunday, December 9, 2007

Column Chart in Microsoft Excel

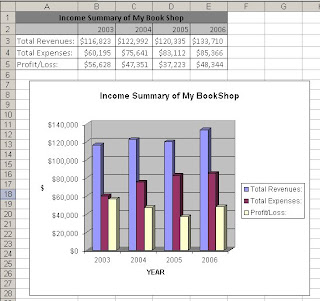
Charts or graphs are an important part of your spreadsheets to summarize your data, and allow you to see clearly the data trends and patterns in your spreadsheets. Here I will provide a step by step tutorial on creating a Column Chart in Excel.

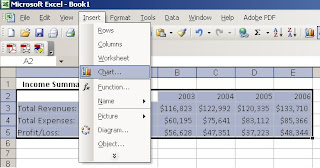
First step of all, you need to enter the data into the spreadsheet. From the figure below, you can see an example of data.


Using your mouse to drag and highlight the cells that contain the titles and data to be included in the column chart.


Next, you need to select a chart type that you preferred the most. Choose menu Insert -> Chart.


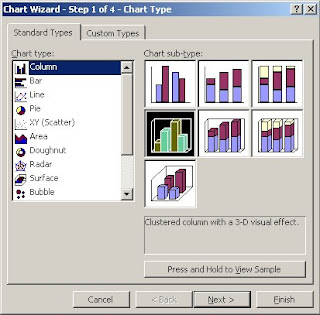
A Chart Wizard will appear as shown below. Choose you desired type and click Next.


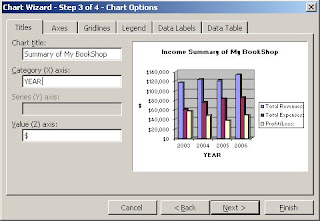
You can format your column chart, such as adding a title, Category (X) axis and Value (Z) axis to the chart, shows label which contains series name, category name or value, shows data table on your chart, and etc.


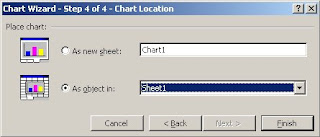
Click Next to continue, you can then choose to put the formatted chart to a new sheet or existing sheet.


Click Finish. Now you can see a chart on your spreadsheet.

Friday, December 7, 2007

Import data from CSV file into data set

In this post, I am going to use the OLE DB Provider for Jet to connect to and query CSV file and then load the data into a dataset.

First of all, I will import the following namespaces:

Imports System.Data
Imports System.Data.OleDb

And then there is a function which will load data from a CSV file and return a dataset.

Private Function LoadCsvData(ByVal filename As String) As DataSet

'Create a new connection
Dim conn As New OleDbConnection("Provider=Microsoft.Jet.OLEDB.4.0;" & _
"Data Source=C:\;" & _
"Extended Properties='text;HDR=Yes;FMT=Delimited'")

'Query the csv file
'Example of file name – Test_CSV.csv
Dim cmd As New OleDbCommand("select * from " & filename, con)

Dim da As New OleDbDataAdapter(cmd)
Dim ds As New DataSet

'Open connection
conn.Open()

'Fill the data set using the data adapter
da.Fill(ds)

'Close the connection
conn.Close()

'Return the dataset
Return ds
End Function

Please change the location of the CSV file.

Thursday, December 6, 2007

Simple script to play music on a HTML document

You can use this EMBED script to play a music in HTML document.

Take a look at the example below. Hope this will help you work it out.

<html>

<head>
<meta http-equiv="Content-Type" content="text/html; charset=iso-8859-1">
<meta name="description" content="play music">
<meta name="GENERATOR" content="Microsoft FrontPage 3.0">
<title>Play music
<SCRIPT language=JavaScript type=text/javascript>
<!--
function StartPlay (){
document.track.Play()
}

function StopPlay(){
document.track.Stop()
}
// -->
</script>

</head>
<body >

<EMBED SRC="your_song.wav" name="track" autostart="false" hidden="true" loop="true"> </EMBED>
<input type="button" onclick="StopPlay()" value="Stop">
<input type="button" onclick="StartPlay()" value="Play">

</body>
</html>

Note: To make it work, you still need any version of Windows Media Player to be installed in your computer, else a plug-in error will occurred.

Wednesday, December 5, 2007

Create Folder in MS Access

Let say you want to create a new folder if it does not exist when you run your application, here is the sample code:

Dim strFolder As String
strFolder = "C:\New Folder"

Dim fso
Set fso = CreateObject("Scripting.FileSystemObject")

‘Check whether the folder exists
If Not fso.FolderExists(strFolder) Then
FileSystem.MkDir (strFolder)
End If

Tuesday, December 4, 2007

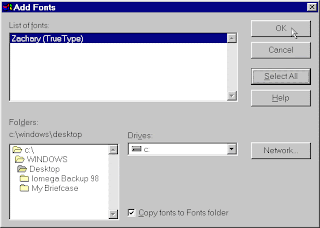
How to install a Font in Windows

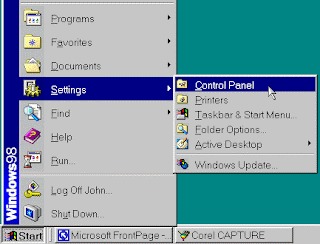
1. Choose Start -> Settings -> Control Panel.
Note: In Windows XP, choose Start -> Control Panel.


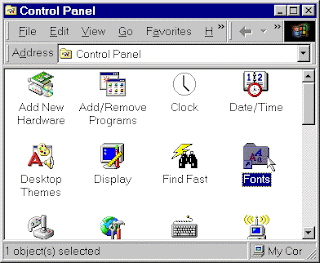
2. Double-clicks the Fonts icon.


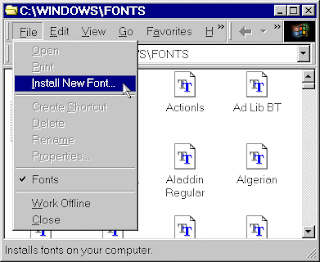
3. Choose File -> Install New Font.


4. Use the Folders Directory box to go to the location where the font was saved. (Use the "Drives" drop-down to select the appropriate drive, if not "C:")


5. The font(s) in the selected folder will display in the "List of Fonts" box. Use Ctrl+click to select individual fonts to install, or the "Select All" button to include the whole list.

6. Click "OK" and the fonts will be installed and copied into the Fonts directory. The desired font is now available for use!

Monday, December 3, 2007

Create a New Recordset in VBA

Here is the sample code on how to create a new recordset.

Sub Create_recordset()
Dim rst As New ADODB.Recordset

‘Add columns
rst.Fields.Append “Field1”, adVarchar, 50
rst.Fields.Append “Field2”, adVarchar, 50


‘Create recordset
rst.Open()

‘Add rows into recordset
rst.AddNew Array("field1", "field2"), Array("string1", “val1”)
rst.AddNew Array("field1", "field2"), Array("string2", “val2”)

End Sub


Happy programming!

Saturday, December 1, 2007

VBA Worksheet

Delete worksheets
For Each ws In oWB.Worksheets
ws.Delete
Next


Add a worksheet
Sub Add_Sheet()
Dim wSht As Worksheet
Dim shtName As String

shtName = Format(Now, "mmmm_yyyy")

For Each wSht In Worksheets
If wSht.Name = shtName Then
MsgBox "Sheet already exists! "
Exit Sub

Else
Sheets.Add.Name = shtName
Sheets(shtName).Move After:=Sheets(Sheets.Count)
Sheets("Sheet1").Range("A1:A5").Copy _
Sheets(shtName).Range("A1")
End If

Next
End Sub


Copy a worksheet
Sub Copy_Sheet()
Dim wSht As Worksheet
Dim shtName As String

shtName = "NewSheet"

For Each wSht In Worksheets
If wSht.Name = shtName Then
MsgBox "Sheet already exists! "
Exit Sub

Else
Sheets(1).Copy before:=Sheets(1)
Sheets(1).Name = shtName
Sheets(shtName).Move After:=Sheets(Sheets.Count)
End If

Next
End Sub
 

Get paid for your opinions! Click on the banner above to join Planet Pulse. Its totally free to sign up, and you can earn UNLIMITED. Find out more by visiting PLANET PULSE.
Sign up for PayPal and start accepting credit card payments instantly. http://www.emailcashpro.com
July Code Blog Copyright © 2010 Blogger Template Designed by Bie Blogger Template