Friday, November 30, 2007

Get the Path to the MS Access Database (.mdb) File

For Access 2000/2002/2003
'returns the database file name
CurrentProject.Name

'returns the database path
CurrentProject.Path

'returns the database path and the file name
CurrentProject.FullName

For Access 97
'returns the database file name
Dir(CurrentDb.Name)

'returns the database path
Left(CurrentDb.Name,Len(CurrentDb.Name)-Len(Dir(CurrentDb.Name)))

'returns the database path and the file name
CurrentDb.Name

'returns the directory that Access [msaccess.exe] is installed in
(SysCmd(acSysCmdAccessDir))

Thursday, November 29, 2007

Replace apostrophe in PHP

When creating SQL statements, string values are delimited using apostrophes. So what happens when there is an apostrophe in the data you are trying to insert? A SQL error will occur if, for example, the value of a variable included an apostrophe. Because you do not know what the user will type in, you must assume they are entering all sorts of bad data.

To insert an apostrophe into the database using SQL you need to put two apostrophes in the text where you want just one. For example, to insert the phrase "what's it?" into a database, the SQL code looks like:
INSERT INTO mytable (phrases) VALUES ('what''s it?')

In PHP there is a string function which allows you to replace on the variable easily: str_replace This function replaces one value with another in a string. So before you insert data in the database you should replace all single apostrophes with double-apostrophes. For the example variable, the PHP code is:
$comment = str_replace("'","''",$comment);

Tuesday, November 20, 2007

Pass Parameter Value from Form to Query

Recently working with extracting data from Access Database and export it to an excel file. To achieve all these, I created a query that pulls up some data from a table which contains a condition that must be filled in by the user. In other words, I need to pass parameters from Form to Query.

Hence when I ran the query, there is an “Enter Parameter Value” dialog box prompted out that must be filled. This is because the query itself actually has a WHERE statement, for example SELECT * FROM table_name WHERE field_name = VAR1;

I tried to use the query and call it from a form that I have created. But it kept give me the error message “Too few parameter”. This is how my codes look like:
sSQL = "Test_Partner"
Set dbs = CurrentDb
Set rst = dbs.OpenRecordset(sSQL, dbOpenSnapshot)

The query just cannot get the parameter value then I referred it to. After a few hours of try out, finally the error has disappeared.

To make it work, i had amended my codes as the following:
sSQL = "Test_Partner"
Set dbs = CurrentDb
Dim qdf As DAO.QueryDef
Dim prm As DAO.Parameter
Set qdf = dbs.QueryDefs(sSQL)
For Each prm In qdf.Parameters
prm.Value = Eval(prm.Name)
Next prm
Set rst = qdf.OpenRecordset()

And amended my query as well, as follow:

SELECT * FROM TABLE1 WHERE TABLE1.FIELD1 = [Forms]![Formname]![Controlname];

Yes. If you are calling a Query from a Form, this will help to solve the problem.

In my case, I called the Query from a Subform, so this makes thing more complicated, as I need to pass the parameter from the subform via its main form. Here is the query looks like on how to pass parameter value via main form:

SELECT * FROM TABLE1 WHERE TABLE1.FIELD1 = [Forms]![Main_Formname]![Sub_Formname]![Controlname];

Hope this can help you. Have a good day!

Monday, November 12, 2007

Timeout Expired in ASP .NET


This error occurs when a database query or stored procedure’s execution time beyond a pre-set timeout period. When you are trying to retrieve a huge amount of data, more execution time may be required.

There are 2 main Timeout properties in .NET:
1. Connection Timeout – It could be solved by setting ConnetionTimeout property in your connection string. For example:
<add key="DBConnection" value="server=localhost;uid=sa;pwd=;database=dbName;Connect Timeout=200; pooling='true'; Max Pool Size=200"/>

2. Timeout for Data Access (Command Object) – You can set a CommandTimeout property to your Command object. For example:
public void CreateMySqlCommand() {
SqlCommand myCommand = new SqlCommand();
myCommand.CommandTimeout = 15;
myCommand.CommandType = CommandType.Text; }

or if you are using data adapter instead of SqlCommand, you can get the Timeout property via: DataAdapter.SelectCommand.CommandTimeout

Wednesday, November 7, 2007

HIDE/UNHIDE ROW/COLUMNS IN EXCEL

Sometimes when you open an Excel file, you will notice that some columns are missing. This is one of the features to unhide and hide rows and columns in the worksheet without affecting calculations in any way.


Hiding rows and columns can be displayed in two ways:
1. Select rows and columns that you wish to hide, and then go to Format -> Row or Column -> Hide.


2. Select rows and columns that you wish to hide, and then right click. Select Hide.


For displaying a hidden first column, it can be tricky if the hidden column is the left-most hidden column.
From the picture as below, notice that the month January to June is invisible.


To unhide the left-most hidden column(s), follow the steps below:
1. From the menu, click Edit -> Go To, or just press F5 will do.


2. A dialog box will be shown. In the Reference field, enter A1 (Column A Row 1).


3. Click OK. Now cell A1 is selected (but because of column A is invisible, so you cannot see it on the screen).
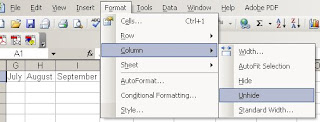
4. From the menu, click Format -> Column -> Unhide.


Notice that January now can be seen from the screen.


Another way to unhide the first column highlight the header of column B and drag to the very left of the spreadsheet until the gray block that marks the intersection of row and column headers, which mean column B and everything to its left (including the hidden column A) are selected.


Choose Unhide from the menu Format -> Column.

Tuesday, November 6, 2007

ORACLE ERROR: ORA-28000: The account is locked

One of my colleagues is getting the following error when tried to logging into a business object which using oracle database, and got this error. Finally a quick web search gave the solution.

Cause: The user has entered wrong password consequently for maximum number if times specified by the user’s profile parameter FAILED_LOGIN_ATTEMPTS or the DBA has locked the account

Action: Wait for PASSWORD_LOCK_TIME or contact DBA

DBA must unlock these accounts to make them available to users. Look at the script below to unlock a user:
ALTER USER ejuly ACCOUNT LOCK -- lock a user account

But do take note with a case-sensitive name. Look at the script below then you can see the different more clearly.
SQL> create user "ejuly" identified by ejuly account lock;
User created.

SQL> select username, account_status from dba_users where username='ejuly';
USERNAME ACCOUNT_STATUS
----------------- ---------------------
ejuly LOCKED

SQL> alter user ejuly account unlock;
alter user ejuly account unlock
*
ERROR at line 1:
ORA-01918: user 'EJULY' does not exist

SQL> alter user "ejuly" account unlock;
User altered.

SQL>

Monday, November 5, 2007

Run a Query to Show All Table

Mysql:
This allows you to see all existing tables inside the database selected.
mysql> SHOW TABLES;

Oracle:
Oracle doesn't support the above command, though an equivalent would be to use this sql statement:
sql > SELECT * FROM tab WHERE TABLE_TYPE = 'TABLE';
or
sql > SELECT * FROM cat WHERE TABLE_TYPE = 'TABLE';
or
sql > select * from user_objects where object_type = 'TABLE';

SQL Server:
Run the script below in your query analyzer.
SELECT * FROM INFORMATION_SCHEMA.TABLES where TABLE_TYPE = 'BASE TABLE'

Saturday, November 3, 2007

如何拯救遗失文件

前几天在报章上看到了“拯救遗失文件有妙方”的报导,想和大家分享一下。

电脑系统崩溃,重新装置软件系统,把原本存档的文件都给删除了,这是多么令人头痛的事。

许多人不知道原来各种数码资料,包括储存在电脑硬盘,相机,手机,录像机,还有还有CD,DVD光碟,MP3曲目,删除了都能被拯救还原的。

一般人认为按了Delete按钮后,资料就找不回了,其实并不然。当你删除某些资料时,电脑操作系统(Operating System)只是把资料所占据的硬盘空间贴上(free space)标志,之后再重用这一块空间来记录其它资料。但是如果时间过得太久了,同一块空间被重复用了很多次之后,以前的数据就未必能找的回了。


如何拯救文件
当我们不小心删除了重要文件时或电脑系统倒垮时,首先要确保不要再继续储存新的文件,以免资料被改写。如果使用Windows电脑视窗,可先到“回收站”(Recycle Bin)文件夹检查该文件是否还在。

如果还在,按“全部恢复”即可。

如果文件已经不在“回收站”了,只要不再加入新资料改写了原本损失资料的位置。请依照以下指示:

1. 从www.adrc.net下载“ADRC Recovery Tools”的免费软件。它能帮助“复删除”(un-delete)文件。
2. 把软件储存在额外硬碟(external hard disk)或USB thumb drive,从那里操作软件。
3. 修复后把该文件储存在新的文件夹中,因为旧有部分的数据分块(data partition)可能受损。
4. 确保文件已经完全修复了,才使用之前数据占据的旧数据分块。

Something useful with virtual Keyboard

An alternative keyboard in Windows -
In case your keyboard or some keys stop working, Microsoft provides you with an alternative way to type in using the mouse.

To work this tool, goes to 'Start menu'
Then Select 'Run'
Type in 'OSK'

Press OK


A keyboard will appear that you can use as normal keyboard

Friday, November 2, 2007

Splitting a Microsoft Access Database

In this article, I will mention about the pros and cons of splitting the database, and implementing how to split a database step by step.

Generally, you will split your MS Access database into front-end database and back-end database, which back-end application will contains only the database table and front-end application will contain all of the queries, forms, reports, macros and modules. In a multi-user environment, the front-end database will be distributed to each client machine, and the back-end database will be installed on the server.

There are several advantages to split a database:
• Multiple users across a network share one common set of data
• Multiple users can update data at the same time
• Users will not be able to make design changes to tables
• You can update the application (forms, reports etc) without interrupting processing or corrupting the data

The disadvantages to split a database:
• All authorized users must have read/write permissions on the back-end database, though security measures must be implemented
• When a large number of users access to the back-end database at the same time, the network and database must be able to handle the traffic.

To run a single copy in a network directory which is shared by multiple users is likely to result in:
• Excessive network traffic
• Slow response
• Possibly file corruptions

How to Split a Microsoft Access Database
Splitting a database into front-end and back-end database is very easy seems it provides Database Splitter Utility already.
1. Open the database to be split
2. From the main menu, choose Tools | Database Utilities | Database Splitter
3. Click on Split Database
4. Enter a name for the back-end database. Default file name will appear as DbName_be.mdb.
5. Click the Split button
6. Click OK when the message appears informed that database split successfully
7. Test on both databases to make sure that proper links have been created.

Now, when you click on the tables tab of your front-end database, you can see that all the table names have an arrow next to them. This is an indicator that they are linked to data outside of this file.

Maintaining a Split Database
After the database is split, both of the database file must be keep in sync. If the back-end database is changed or moved, you must refresh the linked tables. There is 2 ways to update the linked tables in a split database.

Linked Table Manager
If you have added new fields to the existing table or remove the back-end database to a new location, then you can use Linked Table Manager to update the linked tables. To update the linked tables:
1. From the main menu, choose Tools | Database Utilities | Linked Table Manager
2. Check the Always prompt for new location check box.
3. Choose Select All.
4. Click OK.
5. A dialog window will prompt out. Select the location of your back-end database.
6. Click OPEN.
7. A message will indicate that all selected linked tables were successfully refreshed.

If you have added new tables into your back-end database, there is another way to update it into your front-end database. To update it:
1. From the main menu, choose File | Get External Data | Link Tables.
2. Navigate to your updated back-end database and click Link.
3. A window will prompt out with the list of tables name in your back-end database. Select the new table that you have updated and click OK.
4. The new updated table will be appeared in your front-end database.

Thursday, November 1, 2007

Option Explicit and Option Strict in VB .NET

Generally it is a MUST to put ‘Option Explicit’ and ‘Option Strict’ at the top of all my .net classes.

Option Explicit Statement
By default, the Visual Basic .NET or Visual Basic 2005 compiler enforces explicit variable declaration, which requires that you declare every variable before you use it.

Option Strict Statement
Option Strict’ keeps VB developers coding bad casts. By default, the Visual Basic .NET or Visual Basic 2005 compiler does not enforce strict data typing.

In Visual Basic .NET, you can convert any data type to any other data type implicitly. Data loss can occur when the value of one data type is converted to a data type with less precision or with a smaller capacity. However, you receive a run-time error message if data will be lost in such a conversion. Option Strict notifies you of these types of conversions at compile time and restricts implicit type conversions, so that you can avoid them. It also verifies that functions have return types and all paths return a value. it helps to catch lot of possible errors, but it is off by default.

To enable the Option Strict and Option Explicit statements in the code-behind files and files that are contained in the App_Code folder of a Visual Basic application, add the following code to the Web.config file:
<system.codedom>
<compilers>
<compiler language="c#;cs;csharp" extension=".cs" type="Microsoft.CSharp.CSharpCodeProvider, System, Version=2.0.0.0, Culture=neutral, PublicKeyToken=b77a5c561934e089" warningLevel="0" />
<compiler language="vb;vbs;visualbasic;vbscript" extension=".vb" type="Microsoft.VisualBasic.VBCodeProvider, System, Version=2.0.0.0, Culture=neutral, PublicKeyToken=b77a5c561934e089" warningLevel="0" />
</compilers>
</system.codedom>
 

Get paid for your opinions! Click on the banner above to join Planet Pulse. Its totally free to sign up, and you can earn UNLIMITED. Find out more by visiting PLANET PULSE.
Sign up for PayPal and start accepting credit card payments instantly. http://www.emailcashpro.com
July Code Blog Copyright © 2010 Blogger Template Designed by Bie Blogger Template