Saturday, December 29, 2007

Server.MapPath Method

If you need to go to a file from your page, you may need to know the exact file path in order to access to it. In this case, you can use Server.MapPath method.

Server.MapPath method takes a path as a parameter and returns the physical path corresponding to the path.

For example, there is an xml file (database.xml) which stored a list of connection string is located in the C:\inetpub\wwwroot\webapplication1\database directory, and you need to get the connection string to connect to an appropriate database. The C:\inetpub\wwwroot directory is set as the web root directory.

The script uses the slash character to specify that the path returned should treated as a complete virtual path on the server and mapped from the root folder.
string path = Server.MapPath(“/webapplication1/database/database.xml”)
This script will output as the following:
C:\inetpub\wwwroot\webapplication1\ database\database.xml
If the passed parameter does not start with a slash character, it will map to its current directory, in this case will be C:\inetpub\wwwroot\webapplication1.
string path = Server.MapPath(“database/database.xml”)
This will produce the same result.

Below are some tricks on Server.MapPath method.

' the current directory
currDir = Server.MapPath(".")

' the parent directory
parentDir = Server.MapPath("..")

' the application's root directory
rootDir = Server.MapPath("/")

Friday, December 28, 2007

List of Parameters Supported by Windows Media Player 7 and Later Version


By adding some PARAM elements in your Windows Media Player object, you can decide the outlook and the functionality of your Windows Media Player. It enables you to specify certain player properties when the page is browsed. Below is a list of common parameters supported by Windows Media Player and later version.


  1. autoStart
    • Default: true
    • Description: Specifies or retrieves a value indicating whether the current media item begins playing automatically.

  2. balance
    • Default: 0
    • Description: Specify the current stereo balance.

  3. baseURL
    • Default: -
    • Description: Specifies the base URL used for relative path resolution with URL script commands that are embedded in media items.

  4. captioningID
    • Default: 0
    • Description: Specifies the name of the element displaying the captioning.

  5. currentMarker
    • Default: 0
    • Description: Specifies the current marker number.

  6. currentPosition
    • Default: 0
    • Description: Specifies the current position in the media item in seconds.

  7. defaultFrame
    • Default: -
    • Description: Specifies the name of the frame used to display a URL.

  8. enableContextMenu
    • Default: true
    • Description: Specifies a value indicating whether to enable the context menu, which appears when the right mouse button is clicked.

  9. enabled
    • Default: false
    • Description: Specifies whether the Windows Media Player control is enabled.

  10. filename
    • Default: -
    • Description: Specifies the name of the media item to play. You can specify a local filename or a URL.

  11. fullScreen
    • Default: false
    • Description: Specifies whether video content is played back in full-screen mode.

  12. InvokeURLs
    • Default: true
    • Description: Specifies a value indicating whether URL events should launch a Web browser.

  13. Mute
    • Default: false
    • Description: Specifies if audio is muted.

  14. Loop
    • Default: false
    • Description: Specifies if audio is played continuously.

  15. PlayCount
    • Default: 1
    • Description: Specifies the number of times a media item will play. Minimum value of one.

  16. Rate
    • Default: 1.0
    • Description: Specifies the playback rate.
      0.5 equates to half the normal playback speed, 2 equates to twice.

  17. stretchToFit
    • Default: false

    • Description: Specifies whether video displayed by the control automatically sizes to fit the video window, when the video window is larger than the dimensions of the video image.

  18. uiMode
    • Default: full

    • Description: Specifies which controls are shown in the user interface. Possible values: invisible, none, mini, full.

  19. URL
    • Default: -
    • Description: Specifies the name of the media item to play. You can specify a local filename or a URL.

  20. volume
    • Default: Last setting
    • Description: Zero specifies no volume and 100 specify full volume.

  21. windowlessVideo
    • Default: false
    • Description: Specifies or retrieves a value indicating whether the Windows Media Player control renders video in windowless mode.
      When windowlessVideo is set to true, the Player control renders video directly in the client area, so you can apply special effects or layer the video with text.
      Supported by Windows Media Player for Windows XP or later.

Thursday, December 20, 2007

Template Column VS Bound Column

This post will explain how to get information from your data grid for Template Column and Bound Column. There is so many times that when I am trying to retrieve the value of certain column from a data grid, I can get the value of the first column (Bound Column). However, I cannot get the value of the second column (Template Column). And both of the columns are not empty though.

The explanation below is what I had found out finally.

Basically, the difference between BoundColumn and TemplateColumn is that you have more control over what and how things are rendered in TemplateColumn. For example, you can decide what controls are used when editing. With Bound Column creates column bound to a field in the data source and rendered in a table cell. You can use a cell’s Text property to get whatever text is there. But please note that this only works for Bound Column.

Here is a sample of HTML code:
<asp:BoundColumn DataField="COUNTRY" HeaderText="Country">
    <HeaderStyle Font-Size="11px"></HeaderStyle>
    <ItemStyle Font-Size="10px"></ItemStyle>
</asp:BoundColumn>

<asp:TemplateColumn HeaderText="Address">
    <HeaderStyle Font-Size="11px"></HeaderStyle>
    <ItemStyle Font-Size="10px"></ItemStyle>
    <ItemTemplate>
        <%# Container.DataItem("ADDRESS")%>
    </ItemTemplate>
    <EditItemTemplate>
        <asp:Label id="lblAddress" Text='<%# Container.DataItem("ADDRESS")%>' Runat="server"></asp:Label>
    </EditItemTemplate>
</asp:TemplateColumn>

From the HTML code as above, as you can see, the first bound column will bind the “COUNTRY” columns to its data field, while the second template column will use a Label control to bind the value into it.

Protected Sub GetColumnValue()
    'Bound Column... works
    Label1.Text = e.Item.Cells(0).Text

    'Template Column...doesn't work
    
Label2.Text = e.Item.Cells(1).Text
End Sub


This is because .NET sees the contents inside the Bound Column as Text and the contents inside the Template Column as a DataBoundLiteralControl (a collection of server controls).

So, to get the value of the second column, you would have to access the DataBoundLiteralControl’s Text property by using FindControl method. Here is the sample code:
Protected Sub GetColumnValue()
    'Bound Column...works
    Label1.Text = e.Item.Cells(0).Text

    'Template Column...works
    Label2.Text = CType(e.Item.FindControl("lblAddress"), Label).Text
End Sub

Tuesday, December 18, 2007

Hiding and Showing Columns in the Data Grid

Some programmers have face the problem controlling the visibility of certain column in the Data Grid control. In this post, I will show you how to hide and show certain column in the data grid.

Data grid control has a property called AutoGenerateColumns. By default, its values is set to True, which will contain all of the column names of the data set as you bind it with the data set. If you set the AutoGenerateColumns to True, then you would not be able to control the visibility of the columns.

You can either use asp:BoundColumn or asp:TemplateColumn. For asp:BoundColumn, you need to specify the HeaderText and its DataField. Here is a tiny part of html sample code:
<asp:BoundColumn DataField="COUNTRY" HeaderText="Country">
    <HeaderStyle Font-Size="11px" >
    </HeaderStyle>
    <ItemStyle Font-Size="10px" >
    </ItemStyle>
</asp:BoundColumn>

<asp:BoundColumn DataField="ADDRESS" HeaderText="Address">
    <HeaderStyle Font-Size="11px" >
    </HeaderStyle>
    <ItemStyle Font-Size="10px" >
    </ItemStyle>
</asp:BoundColumn>

Or with asp:TemplateColumn, you need to specify its HeaderText and bind value into it. For example:
<asp:TemplateColumn HeaderText="Country">
    <HeaderStyle Font-Size="11px" >
    </HeaderStyle>
    <ItemStyle Font-Size="10px" >
    </ItemStyle>
    <ItemTemplate>
        <%# Container.DataItem("COUNTRY")%>
    </ItemTemplate>
</asp:TemplateColumn>

<asp:TemplateColumn HeaderText="Address">
    <HeaderStyle Font-Size="11px" >
    </HeaderStyle>
    <ItemStyle Font-Size="10px" >
    </ItemStyle>
    <ItemTemplate>
        <%# Container.DataItem("ADDRESS")%>
    </ItemTemplate>
</asp:TemplateColumn>

From the html sample code as above, now you can control the visibility of the columns easily. In your .aspx page, you can add in two buttons (btnShow and btnHide) and set OnClick event handlers to them which will do the work of hiding and showing the column “Address” in code behind file.
Private Sub btnShow_Click(ByVal sender As Object, ByVal e As System.EventArgs) Handles btnShow.Click
      dg.Columns(1).Visible = True
End Sub

Private Sub btnHide_Click(ByVal sender As Object, ByVal e As System.EventArgs) Handles btnHide.Click
      dg.Columns(1).Visible = False
End Sub

Here it is, a simple way to control the visibility of your data grid’s columns. Good luck.

Friday, December 14, 2007

Server.Transfer VS Server.Execute

Server.Transfer
Server.Transfer takes the control execution of the page to the new page and thereafter it doees not return to the original page. This execution happens at the server side and the client is unaware of the change, and hence it maintains the original URL.

Server.Execute
In Server.Execute method, a URL is passed as a parameter, and the control moves to this specified page. Execution of code happens on this specified page. Once the execution is over, the control will return to the original page.

This method is very useful if you want to execute something in a specified page, and then come back to the original page.

The URL in the browser also remains the original form's URL.

Wednesday, December 12, 2007

Server.Transfer VS Response.Redirect

Example: A webform1.aspx wants to send the user to webform2.aspx.

Response.Redirect
Response.Redirect method simply causes the client browser to move to another specified URL, as code below:
Response.Redirect(“webform2.aspx”)

When it is called, it will send a 302 (Object Moved) redirect header to the client browser, telling it that webform1.aspx has moved to webform2.aspx and then the browser will send a request to the server for webform2.aspx. When the browser receives responses from the server, it uses the header information to generate another HTTP request to the new URL.

For this method, the redirection happens at the client side, so it involves 2 round trips to the server: request the original page, and request for the redirected page.

When webform1.aspx is redirected to webform2.aspx, query string parameters in webform1.aspx are unavailable in webform2.aspx. If you want to pass value from webform1.aspx to webform2.aspx, you have to pass it either by query string parameters or store it in a Session object.

Since the client browser initiates another second request, so it is possible to redirect to an external site.


Server.Transfer
Server.Transfer method runs the execution for navigate from webform1.aspx to webform2.aspx on the server side, and sends the result to the client browser. When this method is been called, webform1.aspx terminates execution and the flow of control is transferred to webform2.aspx. The webform2.aspx still uses the response stream created by the webform1.aspx.

When you use this method to navigate between pages, Server.Transfer maintains the original URL on the browser, namely webform1.aspx, because the navigation occurs on the server side and the client browser remains unaware of the transfer. You can’t use Server.Transfer to send users to an external site since the execution is running on the server.

Server.Transfer has a second parameter called preserveForm. By default, it is set to false and does not pass the form data or the query string of the original page to the transferred page. But by set it to True, you can preserve them to the page that you are redirected to, as code below:
Server.Transfer(“webform2.aspx”, True)

For example, there is a textbox1 in webform1.aspx. With the preserveForm parameter set to True, you would be able to retrieve the value of textbox1 in webform2.aspx by referencing Request.Form(“textbox1”).

But be aware that when this method is been used, an error will occur in certain circumstances that attempting to transfer the form and query string values. The destination page uses the same response stream that was created by the original page, and therefore the hidden _VIEWSTATE field of the original page ends up on the second page, which may causes the ASP.NET machine authentication check (MAC) assumes that the ViewState of the new page has been modified on the client.

To resolve this problem:
1. Do not pass the second parameter (default is false) if it is unnecessary. When no query string or Form fields is been transferred to the destination page, ASP.NET does not run the MAC.
2. Set the enableViewstateMac property to True on the destination page, and then set it back to False.

Tuesday, December 11, 2007

Adding an embedded Windows Media Player on HTML document

This article describes how to embed Windows Media Player to play music or video in HTML document, it also includes required code in HTML and JavaScript.

To embed Windows Media Player, you need to add an OBJECT element for the Windows Media Player ActiveX control. Here is the code to add the OBJECT element on your web page.
<HTML>
<HEAD>
<TITLE>Embedded Windows Media Player Web Page</TITLE>
</HEAD>
<BODY>

<OBJECT ID="Player" width="320" height="240"
CLASSID="clsid:6BF52A52-394A-11d3-B153-00C04F79FAA6">
</OBJECT>

</BODY>
</HTML>

As you can see, there is a CLASSID number there. This CLASSID may differ depends on the Windows Media Player’s version. The CLASSID is for Windows Media Player 7, 9, 10 and 11. If you want to embed Windows Media Player 6.4 instead of the latest version, the class ID is clsid:22D6F312-B0F6-11D0-94AB-0080C74C7E95.

Add PARAM Parameters
Besides, you can decide the player’s functionality by adding some PARAM elements. It enables you to specify certain player properties when the page is browsed.

In this example, I had added in 3 parameters which let the media item begins playing automatically and non stop when the page is browsed point to the path of my music file.

<HTML>
<HEAD>
<TITLE>Embedded Windows Media Player 7 Control</TITLE>
</HEAD>
<BODY>

<OBJECT ID="Player" width="320" height="240"
CLASSID="clsid:22D6f312-B0F6-11D0-94AB-0080C74C7E95">
<PARAM name="autoStart" value="false">
<PARAM name="filename" value="your_song.wav">
<PARAM NAME = "loop" VALUE = "True">
</OBJECT>

</BODY>
</HTML>

Controlling Windows Media Player using Java script code
Here is a few examples of scripts to control Windows Media Player.
Start playback:
Player.controls.play();
Stop playback:
Player.controls.Stop();
Pause playback:
Player.controls.Pause();
Mute setting:
Player.settings.mute = “1”;
Unmute setting:
Player.settings.mute = “0”;
Volume up setting:
Player.settings.volumn = Player.settings.volumn + 10;
Volume down setting:
Player.settings.volumn = Player.settings.volumn – 10;

Here is the complete code of it. There is only Start and Stop button in this sample. Hope this will help you.

<HTML>
<HEAD>
<TITLE>Embedded Windows Media Player 7 Control<SCRIPT>
<!--
function StartPlay ()
{
Player.Controls.play();
}

function StopPlay ()
{
Player.Controls.stop();
}
-->
</SCRIPT>

</HEAD>
<BODY>
<OBJECT ID="Player" width="320" height="240"
CLASSID="clsid:22D6f312-B0F6-11D0-94AB-0080C74C7E95">
<PARAM name="autoStart" value="false">
<PARAM name="filename" value="your_song.wav">
<PARAM NAME = "loop" VALUE = "True">
</OBJECT>

<BR>
<INPUT TYPE="BUTTON" NAME="BtnPlay" VALUE="Play" OnClick="StartPlay()">
<INPUT TYPE="BUTTON" NAME="BtnStop" VALUE="Stop" OnClick="StopPlay()">

</BODY>
</HTML>

Note that if you are using version 6.4, you can change the two player methods. In the StartPlay() function change the method to Player.play(), and in the StopPlay() function to Player.stop().

Sunday, December 9, 2007

Column Chart in Microsoft Excel

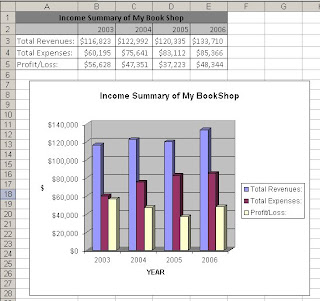
Charts or graphs are an important part of your spreadsheets to summarize your data, and allow you to see clearly the data trends and patterns in your spreadsheets. Here I will provide a step by step tutorial on creating a Column Chart in Excel.

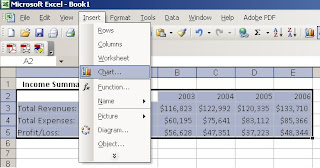
First step of all, you need to enter the data into the spreadsheet. From the figure below, you can see an example of data.


Using your mouse to drag and highlight the cells that contain the titles and data to be included in the column chart.


Next, you need to select a chart type that you preferred the most. Choose menu Insert -> Chart.


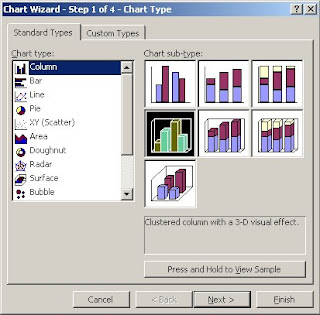
A Chart Wizard will appear as shown below. Choose you desired type and click Next.


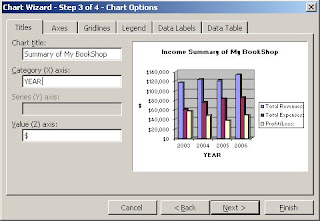
You can format your column chart, such as adding a title, Category (X) axis and Value (Z) axis to the chart, shows label which contains series name, category name or value, shows data table on your chart, and etc.


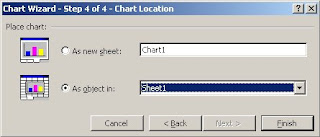
Click Next to continue, you can then choose to put the formatted chart to a new sheet or existing sheet.


Click Finish. Now you can see a chart on your spreadsheet.

Friday, December 7, 2007

Import data from CSV file into data set

In this post, I am going to use the OLE DB Provider for Jet to connect to and query CSV file and then load the data into a dataset.

First of all, I will import the following namespaces:

Imports System.Data
Imports System.Data.OleDb

And then there is a function which will load data from a CSV file and return a dataset.

Private Function LoadCsvData(ByVal filename As String) As DataSet

'Create a new connection
Dim conn As New OleDbConnection("Provider=Microsoft.Jet.OLEDB.4.0;" & _
"Data Source=C:\;" & _
"Extended Properties='text;HDR=Yes;FMT=Delimited'")

'Query the csv file
'Example of file name – Test_CSV.csv
Dim cmd As New OleDbCommand("select * from " & filename, con)

Dim da As New OleDbDataAdapter(cmd)
Dim ds As New DataSet

'Open connection
conn.Open()

'Fill the data set using the data adapter
da.Fill(ds)

'Close the connection
conn.Close()

'Return the dataset
Return ds
End Function

Please change the location of the CSV file.

Thursday, December 6, 2007

Simple script to play music on a HTML document

You can use this EMBED script to play a music in HTML document.

Take a look at the example below. Hope this will help you work it out.

<html>

<head>
<meta http-equiv="Content-Type" content="text/html; charset=iso-8859-1">
<meta name="description" content="play music">
<meta name="GENERATOR" content="Microsoft FrontPage 3.0">
<title>Play music
<SCRIPT language=JavaScript type=text/javascript>
<!--
function StartPlay (){
document.track.Play()
}

function StopPlay(){
document.track.Stop()
}
// -->
</script>

</head>
<body >

<EMBED SRC="your_song.wav" name="track" autostart="false" hidden="true" loop="true"> </EMBED>
<input type="button" onclick="StopPlay()" value="Stop">
<input type="button" onclick="StartPlay()" value="Play">

</body>
</html>

Note: To make it work, you still need any version of Windows Media Player to be installed in your computer, else a plug-in error will occurred.

Wednesday, December 5, 2007

Create Folder in MS Access

Let say you want to create a new folder if it does not exist when you run your application, here is the sample code:

Dim strFolder As String
strFolder = "C:\New Folder"

Dim fso
Set fso = CreateObject("Scripting.FileSystemObject")

‘Check whether the folder exists
If Not fso.FolderExists(strFolder) Then
FileSystem.MkDir (strFolder)
End If

Tuesday, December 4, 2007

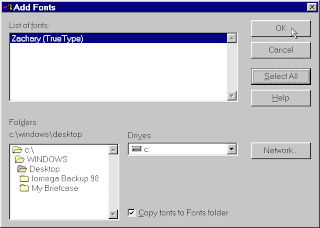
How to install a Font in Windows

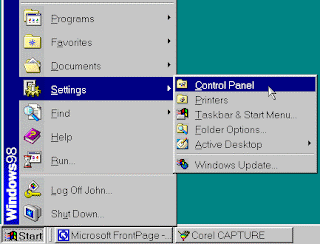
1. Choose Start -> Settings -> Control Panel.
Note: In Windows XP, choose Start -> Control Panel.


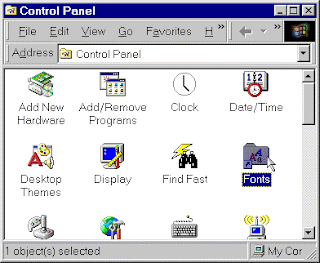
2. Double-clicks the Fonts icon.


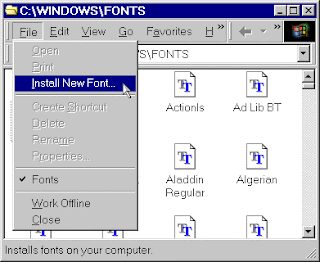
3. Choose File -> Install New Font.


4. Use the Folders Directory box to go to the location where the font was saved. (Use the "Drives" drop-down to select the appropriate drive, if not "C:")


5. The font(s) in the selected folder will display in the "List of Fonts" box. Use Ctrl+click to select individual fonts to install, or the "Select All" button to include the whole list.

6. Click "OK" and the fonts will be installed and copied into the Fonts directory. The desired font is now available for use!

Monday, December 3, 2007

Create a New Recordset in VBA

Here is the sample code on how to create a new recordset.

Sub Create_recordset()
Dim rst As New ADODB.Recordset

‘Add columns
rst.Fields.Append “Field1”, adVarchar, 50
rst.Fields.Append “Field2”, adVarchar, 50


‘Create recordset
rst.Open()

‘Add rows into recordset
rst.AddNew Array("field1", "field2"), Array("string1", “val1”)
rst.AddNew Array("field1", "field2"), Array("string2", “val2”)

End Sub


Happy programming!

Saturday, December 1, 2007

VBA Worksheet

Delete worksheets
For Each ws In oWB.Worksheets
ws.Delete
Next


Add a worksheet
Sub Add_Sheet()
Dim wSht As Worksheet
Dim shtName As String

shtName = Format(Now, "mmmm_yyyy")

For Each wSht In Worksheets
If wSht.Name = shtName Then
MsgBox "Sheet already exists! "
Exit Sub

Else
Sheets.Add.Name = shtName
Sheets(shtName).Move After:=Sheets(Sheets.Count)
Sheets("Sheet1").Range("A1:A5").Copy _
Sheets(shtName).Range("A1")
End If

Next
End Sub


Copy a worksheet
Sub Copy_Sheet()
Dim wSht As Worksheet
Dim shtName As String

shtName = "NewSheet"

For Each wSht In Worksheets
If wSht.Name = shtName Then
MsgBox "Sheet already exists! "
Exit Sub

Else
Sheets(1).Copy before:=Sheets(1)
Sheets(1).Name = shtName
Sheets(shtName).Move After:=Sheets(Sheets.Count)
End If

Next
End Sub

Friday, November 30, 2007

Get the Path to the MS Access Database (.mdb) File

For Access 2000/2002/2003
'returns the database file name
CurrentProject.Name

'returns the database path
CurrentProject.Path

'returns the database path and the file name
CurrentProject.FullName

For Access 97
'returns the database file name
Dir(CurrentDb.Name)

'returns the database path
Left(CurrentDb.Name,Len(CurrentDb.Name)-Len(Dir(CurrentDb.Name)))

'returns the database path and the file name
CurrentDb.Name

'returns the directory that Access [msaccess.exe] is installed in
(SysCmd(acSysCmdAccessDir))

Thursday, November 29, 2007

Replace apostrophe in PHP

When creating SQL statements, string values are delimited using apostrophes. So what happens when there is an apostrophe in the data you are trying to insert? A SQL error will occur if, for example, the value of a variable included an apostrophe. Because you do not know what the user will type in, you must assume they are entering all sorts of bad data.

To insert an apostrophe into the database using SQL you need to put two apostrophes in the text where you want just one. For example, to insert the phrase "what's it?" into a database, the SQL code looks like:
INSERT INTO mytable (phrases) VALUES ('what''s it?')

In PHP there is a string function which allows you to replace on the variable easily: str_replace This function replaces one value with another in a string. So before you insert data in the database you should replace all single apostrophes with double-apostrophes. For the example variable, the PHP code is:
$comment = str_replace("'","''",$comment);

Tuesday, November 20, 2007

Pass Parameter Value from Form to Query

Recently working with extracting data from Access Database and export it to an excel file. To achieve all these, I created a query that pulls up some data from a table which contains a condition that must be filled in by the user. In other words, I need to pass parameters from Form to Query.

Hence when I ran the query, there is an “Enter Parameter Value” dialog box prompted out that must be filled. This is because the query itself actually has a WHERE statement, for example SELECT * FROM table_name WHERE field_name = VAR1;

I tried to use the query and call it from a form that I have created. But it kept give me the error message “Too few parameter”. This is how my codes look like:
sSQL = "Test_Partner"
Set dbs = CurrentDb
Set rst = dbs.OpenRecordset(sSQL, dbOpenSnapshot)

The query just cannot get the parameter value then I referred it to. After a few hours of try out, finally the error has disappeared.

To make it work, i had amended my codes as the following:
sSQL = "Test_Partner"
Set dbs = CurrentDb
Dim qdf As DAO.QueryDef
Dim prm As DAO.Parameter
Set qdf = dbs.QueryDefs(sSQL)
For Each prm In qdf.Parameters
prm.Value = Eval(prm.Name)
Next prm
Set rst = qdf.OpenRecordset()

And amended my query as well, as follow:

SELECT * FROM TABLE1 WHERE TABLE1.FIELD1 = [Forms]![Formname]![Controlname];

Yes. If you are calling a Query from a Form, this will help to solve the problem.

In my case, I called the Query from a Subform, so this makes thing more complicated, as I need to pass the parameter from the subform via its main form. Here is the query looks like on how to pass parameter value via main form:

SELECT * FROM TABLE1 WHERE TABLE1.FIELD1 = [Forms]![Main_Formname]![Sub_Formname]![Controlname];

Hope this can help you. Have a good day!

Monday, November 12, 2007

Timeout Expired in ASP .NET


This error occurs when a database query or stored procedure’s execution time beyond a pre-set timeout period. When you are trying to retrieve a huge amount of data, more execution time may be required.

There are 2 main Timeout properties in .NET:
1. Connection Timeout – It could be solved by setting ConnetionTimeout property in your connection string. For example:
<add key="DBConnection" value="server=localhost;uid=sa;pwd=;database=dbName;Connect Timeout=200; pooling='true'; Max Pool Size=200"/>

2. Timeout for Data Access (Command Object) – You can set a CommandTimeout property to your Command object. For example:
public void CreateMySqlCommand() {
SqlCommand myCommand = new SqlCommand();
myCommand.CommandTimeout = 15;
myCommand.CommandType = CommandType.Text; }

or if you are using data adapter instead of SqlCommand, you can get the Timeout property via: DataAdapter.SelectCommand.CommandTimeout

Wednesday, November 7, 2007

HIDE/UNHIDE ROW/COLUMNS IN EXCEL

Sometimes when you open an Excel file, you will notice that some columns are missing. This is one of the features to unhide and hide rows and columns in the worksheet without affecting calculations in any way.


Hiding rows and columns can be displayed in two ways:
1. Select rows and columns that you wish to hide, and then go to Format -> Row or Column -> Hide.


2. Select rows and columns that you wish to hide, and then right click. Select Hide.


For displaying a hidden first column, it can be tricky if the hidden column is the left-most hidden column.
From the picture as below, notice that the month January to June is invisible.


To unhide the left-most hidden column(s), follow the steps below:
1. From the menu, click Edit -> Go To, or just press F5 will do.


2. A dialog box will be shown. In the Reference field, enter A1 (Column A Row 1).


3. Click OK. Now cell A1 is selected (but because of column A is invisible, so you cannot see it on the screen).
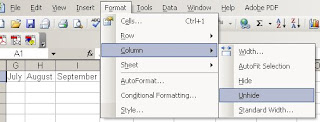
4. From the menu, click Format -> Column -> Unhide.


Notice that January now can be seen from the screen.


Another way to unhide the first column highlight the header of column B and drag to the very left of the spreadsheet until the gray block that marks the intersection of row and column headers, which mean column B and everything to its left (including the hidden column A) are selected.


Choose Unhide from the menu Format -> Column.

Tuesday, November 6, 2007

ORACLE ERROR: ORA-28000: The account is locked

One of my colleagues is getting the following error when tried to logging into a business object which using oracle database, and got this error. Finally a quick web search gave the solution.

Cause: The user has entered wrong password consequently for maximum number if times specified by the user’s profile parameter FAILED_LOGIN_ATTEMPTS or the DBA has locked the account

Action: Wait for PASSWORD_LOCK_TIME or contact DBA

DBA must unlock these accounts to make them available to users. Look at the script below to unlock a user:
ALTER USER ejuly ACCOUNT LOCK -- lock a user account

But do take note with a case-sensitive name. Look at the script below then you can see the different more clearly.
SQL> create user "ejuly" identified by ejuly account lock;
User created.

SQL> select username, account_status from dba_users where username='ejuly';
USERNAME ACCOUNT_STATUS
----------------- ---------------------
ejuly LOCKED

SQL> alter user ejuly account unlock;
alter user ejuly account unlock
*
ERROR at line 1:
ORA-01918: user 'EJULY' does not exist

SQL> alter user "ejuly" account unlock;
User altered.

SQL>

Monday, November 5, 2007

Run a Query to Show All Table

Mysql:
This allows you to see all existing tables inside the database selected.
mysql> SHOW TABLES;

Oracle:
Oracle doesn't support the above command, though an equivalent would be to use this sql statement:
sql > SELECT * FROM tab WHERE TABLE_TYPE = 'TABLE';
or
sql > SELECT * FROM cat WHERE TABLE_TYPE = 'TABLE';
or
sql > select * from user_objects where object_type = 'TABLE';

SQL Server:
Run the script below in your query analyzer.
SELECT * FROM INFORMATION_SCHEMA.TABLES where TABLE_TYPE = 'BASE TABLE'

Saturday, November 3, 2007

如何拯救遗失文件

前几天在报章上看到了“拯救遗失文件有妙方”的报导,想和大家分享一下。

电脑系统崩溃,重新装置软件系统,把原本存档的文件都给删除了,这是多么令人头痛的事。

许多人不知道原来各种数码资料,包括储存在电脑硬盘,相机,手机,录像机,还有还有CD,DVD光碟,MP3曲目,删除了都能被拯救还原的。

一般人认为按了Delete按钮后,资料就找不回了,其实并不然。当你删除某些资料时,电脑操作系统(Operating System)只是把资料所占据的硬盘空间贴上(free space)标志,之后再重用这一块空间来记录其它资料。但是如果时间过得太久了,同一块空间被重复用了很多次之后,以前的数据就未必能找的回了。


如何拯救文件
当我们不小心删除了重要文件时或电脑系统倒垮时,首先要确保不要再继续储存新的文件,以免资料被改写。如果使用Windows电脑视窗,可先到“回收站”(Recycle Bin)文件夹检查该文件是否还在。

如果还在,按“全部恢复”即可。

如果文件已经不在“回收站”了,只要不再加入新资料改写了原本损失资料的位置。请依照以下指示:

1. 从www.adrc.net下载“ADRC Recovery Tools”的免费软件。它能帮助“复删除”(un-delete)文件。
2. 把软件储存在额外硬碟(external hard disk)或USB thumb drive,从那里操作软件。
3. 修复后把该文件储存在新的文件夹中,因为旧有部分的数据分块(data partition)可能受损。
4. 确保文件已经完全修复了,才使用之前数据占据的旧数据分块。

Something useful with virtual Keyboard

An alternative keyboard in Windows -
In case your keyboard or some keys stop working, Microsoft provides you with an alternative way to type in using the mouse.

To work this tool, goes to 'Start menu'
Then Select 'Run'
Type in 'OSK'

Press OK


A keyboard will appear that you can use as normal keyboard

Friday, November 2, 2007

Splitting a Microsoft Access Database

In this article, I will mention about the pros and cons of splitting the database, and implementing how to split a database step by step.

Generally, you will split your MS Access database into front-end database and back-end database, which back-end application will contains only the database table and front-end application will contain all of the queries, forms, reports, macros and modules. In a multi-user environment, the front-end database will be distributed to each client machine, and the back-end database will be installed on the server.

There are several advantages to split a database:
• Multiple users across a network share one common set of data
• Multiple users can update data at the same time
• Users will not be able to make design changes to tables
• You can update the application (forms, reports etc) without interrupting processing or corrupting the data

The disadvantages to split a database:
• All authorized users must have read/write permissions on the back-end database, though security measures must be implemented
• When a large number of users access to the back-end database at the same time, the network and database must be able to handle the traffic.

To run a single copy in a network directory which is shared by multiple users is likely to result in:
• Excessive network traffic
• Slow response
• Possibly file corruptions

How to Split a Microsoft Access Database
Splitting a database into front-end and back-end database is very easy seems it provides Database Splitter Utility already.
1. Open the database to be split
2. From the main menu, choose Tools | Database Utilities | Database Splitter
3. Click on Split Database
4. Enter a name for the back-end database. Default file name will appear as DbName_be.mdb.
5. Click the Split button
6. Click OK when the message appears informed that database split successfully
7. Test on both databases to make sure that proper links have been created.

Now, when you click on the tables tab of your front-end database, you can see that all the table names have an arrow next to them. This is an indicator that they are linked to data outside of this file.

Maintaining a Split Database
After the database is split, both of the database file must be keep in sync. If the back-end database is changed or moved, you must refresh the linked tables. There is 2 ways to update the linked tables in a split database.

Linked Table Manager
If you have added new fields to the existing table or remove the back-end database to a new location, then you can use Linked Table Manager to update the linked tables. To update the linked tables:
1. From the main menu, choose Tools | Database Utilities | Linked Table Manager
2. Check the Always prompt for new location check box.
3. Choose Select All.
4. Click OK.
5. A dialog window will prompt out. Select the location of your back-end database.
6. Click OPEN.
7. A message will indicate that all selected linked tables were successfully refreshed.

If you have added new tables into your back-end database, there is another way to update it into your front-end database. To update it:
1. From the main menu, choose File | Get External Data | Link Tables.
2. Navigate to your updated back-end database and click Link.
3. A window will prompt out with the list of tables name in your back-end database. Select the new table that you have updated and click OK.
4. The new updated table will be appeared in your front-end database.

Thursday, November 1, 2007

Option Explicit and Option Strict in VB .NET

Generally it is a MUST to put ‘Option Explicit’ and ‘Option Strict’ at the top of all my .net classes.

Option Explicit Statement
By default, the Visual Basic .NET or Visual Basic 2005 compiler enforces explicit variable declaration, which requires that you declare every variable before you use it.

Option Strict Statement
Option Strict’ keeps VB developers coding bad casts. By default, the Visual Basic .NET or Visual Basic 2005 compiler does not enforce strict data typing.

In Visual Basic .NET, you can convert any data type to any other data type implicitly. Data loss can occur when the value of one data type is converted to a data type with less precision or with a smaller capacity. However, you receive a run-time error message if data will be lost in such a conversion. Option Strict notifies you of these types of conversions at compile time and restricts implicit type conversions, so that you can avoid them. It also verifies that functions have return types and all paths return a value. it helps to catch lot of possible errors, but it is off by default.

To enable the Option Strict and Option Explicit statements in the code-behind files and files that are contained in the App_Code folder of a Visual Basic application, add the following code to the Web.config file:
<system.codedom>
<compilers>
<compiler language="c#;cs;csharp" extension=".cs" type="Microsoft.CSharp.CSharpCodeProvider, System, Version=2.0.0.0, Culture=neutral, PublicKeyToken=b77a5c561934e089" warningLevel="0" />
<compiler language="vb;vbs;visualbasic;vbscript" extension=".vb" type="Microsoft.VisualBasic.VBCodeProvider, System, Version=2.0.0.0, Culture=neutral, PublicKeyToken=b77a5c561934e089" warningLevel="0" />
</compilers>
</system.codedom>

Wednesday, October 31, 2007

Export Data From MS Access to Excel File

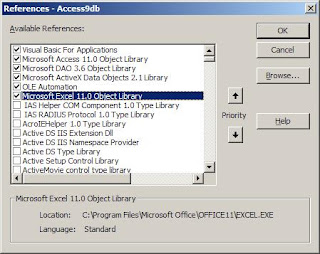
I passed data from MS Access to Excel recently, so I would like to share the techniques and code that I used. Firstly, a reference is needed to be made to Microsoft Excel. To add a reference, go to Tools -> References while working in any code module. As shown from the list, I am using Excel 11 (Office 2003). Look for the Microsoft Excel Object Library that is available on your computer and click the check box.


Here is my code from Access:
Public Function Export() As String
Dim oApp As Excel.Application
Dim oWB As Excel.Workbook
Dim i As Integer
Dim dbs As DAO.Database
Dim rst As DAO.Recordset
Dim sSQL As String

'Create an instance of Excel and add a new blank workbook
sSQL = "SELECT * FROM [table_name]"
Set dbs = CurrentDb
Set rst = dbs.OpenRecordset(sSQL, dbOpenSnapshot)

Set oApp = New Excel.Application
oApp.Visible = False
Set oWB = oApp.Workbooks.Add

'Add the field names as column headers (optional)
For i = 0 To rst.Fields.Count - 1
oWB.Sheets(1).Cells(1, i + 1).Value = rst.Fields(i).Name
Next

oWB.Sheets(1).Range("1:1").Font.Bold = True
oWB.Sheets(1).Cells(2, 1).CopyFromRecordset rst

'Clean up ADO Objects
rst.Close
Set rst = Nothing

'Create a folder if not exist
Dim strFilePath As String
Dim strFolder As String
strFolder = "C:\NewFolder"
strFilePath = strFolder & "\Rpt_" & Format(Now(), "yyyymmdd_HHmmss") & ".xls"

Dim fso
Set fso = CreateObject("Scripting.FileSystemObject")
If Not fso.FolderExists(strFolder) Then
'Create the file
FileSystem.MkDir (strFolder)
End If

'Clean up Excel Objects
oWB.Close SaveChanges:=True, Filename:=strFilePath
Set oWB = Nothing
oApp.Quit
Set oApp = Nothing

'Open the file after export to excel
Shell "EXCEL.EXE """ & strFilePath & "", vbNormalFocus
End Function

HAPPY PROGRAMMING!

Tuesday, October 30, 2007

Import Data from Excel File (.cont)

As I has stated in my previous post regarding to Export Data Form an Excel file, there is one drawback lying behind them. The Sheet1 from the query actually is the name of the spreadsheet in your excel file. What if there is no Sheet1 inside the excel file? What if you don’t even know the sheet name?

Yes. I found this error when I tried to upload an excel file with different sheet name. And here is the solution for that.

To get the sheet name in your excel file, firstly, Microsoft DAO 3.5 Library is needed. Go to Project -> Reference -> Add Reference, select Microsoft DOA 3.5 Library from the list and add to your project. Here is the example code of how to get the first sheet in the excel file.
Dim strConn As String
Dim da As OleDbDataAdapter
Dim ds As New DataSet
Dim dao_dbE As dao.DBEngine
Dim dao_DB As DAO.Database
Dim strSheet As String

dao_dbE = New dao.DBEngine
dao_DB = dao_dbE.OpenDatabase("C:\test.xls", False, True, "Excel 8.0;")
strSheet = dao_DB.TableDefs(0).Name
strConn = "Provider=Microsoft.Jet.OLEDB.4.0;" & _
"Data Source=C:\test.xls;Extended Properties=""Excel 8.0;"""

da = New OleDbDataAdapter("SELECT * FROM [" & _
strSheet & "]", strConn)
da.TableMappings.Add("Table", "Excel")
da.Fill(ds)

Hope this will help you work it out.

Friday, October 26, 2007

CAPITAL LETTERS ONLY in Combo Box

For some reasons, you may need to let users key in ONLY CAPITAL LETTER in your text box or combo box. In the Key Down event, you can capture the key that user has entered and from there, convert the letter to capital letter and return to the text box. Instead of Key Down, you can also use Key Press event. The following codes will make it. Try it out yourself.

Private Sub TextBox1_KeyPress (KeyAscii As Integer)
Char = Chr(KeyAscii)
KeyAscii = Asc(UCase(Char))
End Sub

MAINTAINING SCROLL POSITION IN A WEB USER INTERFACE IN ASP .NET

Some people have problems in maintaining scroll position for a web page after a post back is performed. I had posted an article in PHP example, Maintaining Scroll Position in a Web User Interface in PHP last time.

There is a very simple solution to apply this in ASP .NET. You can just turn on the “Smart Navigation” in the Properties of ASP .NET. But sometimes it can mess up with other JavaScript. Alternatively, you can just add a Java Script to keep the scroll position.

Similar with PHP example, firstly, you need two hidden fields in your form to store the position of X and Y every time a post back is performed. Other than that, you also need two Java Script methods. One is save the position before the page is refreshed; one is set the position X and Y when it is refreshed. Here is the example:
<HTML>
<HEAD>
<TITLE>Maintain Scroll Position</TITLE>

<script>
function SavePos() {
document.Form1.posX.value = document.body.scrollLeft;
document.Form1.posY.value = document.body.scrollTop;
}
function SetPosition() {
var x, y;
x = document.Form1.posX;
y = document.Form1.posY;
if (x != 'undefined' && y != 'undefined')
{
window.scroll (x.value, y.value);
// either use scroll, scrollBy or scrollTo
}
}
</script>

</HEAD>
<BODY onload="SetPosition()">

<form id="Form1" method="post" runat="server"
onsubmit="SavePos();">
<input name="posX" id="posX" type="hidden"
value="0" runat="server" />
<input name="posY" id="posY" type="hidden"
value="0" runat="server" />
<p> A very long page……</p>

<P> A very long page……</P>

</form>

</BODY>
</HTML>

Thursday, October 25, 2007

MAINTAINING SCROLL POSITION IN A WEB USER INTERFACE IN PHP

Anyone who is creating a very long Web Form that entails a lot of post backs may encounter to the user interface problem that occurs in such scenario that loss of scroll position on each post back (namely, if you scroll down to the middle of a long page, and after the browser refreshed, the scroll position is lost).

For this case, using Java Script for keeping the scroll position is the best way to go. Java Script can help us to know the current position of the browser.

Firstly, you need two hidden fields in your form to store the position of X and Y every time a post back is performed. Other than that, you also need two Java Script methods. One is save the position before the page is refreshed; one is set the position X and Y when it is refreshed. Here is the example:
<HTML>
<HEAD>
<TITLE>Maintain Scroll Position</TITLE>

<script>
function SavePos() {
document.Form1.posX.value = document.body.scrollLeft;
document.Form1.posY.value = document.body.scrollTop;
}
function SetPosition() {
var x, y;
x = document.Form1.posX;
y = document.Form1.posY;
if (x != 'undefined' && y != 'undefined')
{
window.scroll (x.value, y.value);
// either use scroll, scrollBy or scrollTo
}
}
</script>

</HEAD>
<BODY onload="SetPosition()">

<form name="Form1" id="Form1" method="post"
onsubmit="SavePos()" action="index.php">
<input name="posX" id="posX" type="hidden"
value="<?php echo $_REQUEST['posX'] ? >" />
<input name="posY" id="posY" type="hidden"
value="<?php echo $_REQUEST['posY'] ? >" />
<p>A very long page……</p>

<P> A very long page……</P>
</form>

</BODY>
</HTML>

Good Luck!

Wednesday, October 24, 2007

Dealing with apostrophes in SQL strings

In many applications, the developer has side-stepped the potential use of the apostrophe in some of the text fields. So when adding values to a table, be aware that problems may be caused by embedded apostrophes in a string.

Consider the SQL Insert statement below.

INSERT INTO table_name (table_field_name) VALUES (‘O’reill’, ‘92314567’)

Notice that there is an apostrophe in the text “O’reill”. In SQL, the apostrophe is an illegal character. It is interpreted as a string delimiter or the end of the string. So when it encounters to the text and detects another apostrophe, an error will occur.

A very simple solution to solve the problem: to allow apostrophes to be inserted into a database, simply double-up all occurrences of the apostrophes. So the final SQL will look like this:

INSERT INTO table_name (table_field_name) VALUES (‘O’’reill’, ‘92314567’)

In VB.NET, in order to convert the single enclosed apostrophe to two apostrophes, you can use Replace statement to accomplish the replacement.

"'" & Replace (txtName.text, "'", "''") & "'"

Good Luck!

Tuesday, October 23, 2007

Embedded Java Script in ASP .NET

Many developers like to use the flexibility of writing Java Script in ASP .NET to achieve the functionality they need or notify users of some server-side behavior. For example, if there was some server-side error and the data entered weren’t correctly saved, or the data entered by users are not in the correct format. In this case, we might want to pop up alert message box to inform the users.

Basically there are two ways to write a java script code in ASP .NET. Either call the java script in the html of the page by creating an onload event, or we can use an additional methods provided in ASP .NET to handle this in the code behind and register a client script block with the ASP .NET web page.

There are two methods available to register a script in .NET environment. There are RegisterStartUpScript and RegisterClientScriptBlock.


RegisterStartUpScript
This method takes two string inputs:
RegisterStartUpScript (string key, string script)
// Key – unique key that identifies a script block
// Script – content of the script that will be sent to the client

Typically what will happen is when the user clicks to submit his/her data, we will do some processing and validation checking, and then alert user of some unexpected behavior. Thus, we will call the RegisterStartUpScript() method in the Click event handler of the button.

Here is a simple example for that.

The code first generates an error message by checking field values (in this case if a txtName TextBox control was empty) and builds the message appropriately. Next, we will build the client-side JavaScript script block. Note that before I register the script, I added a conditional if statement, IsStartupScriptRegistered(string key). This is very essential calling this method to avoid unnecessary assembling of the client-side script.
IsStartUpScriptRegistered(string key)
// key – the string key of the start up script to search for. This method will check
// whether the script is already registered or not.


RegisterClientScriptBlock
This method takes two string inputs:
RegisterClientScriptBlock (string key, string script)
// Key – unique key that identifies a script block
// Script – content of the script that will be sent to the client

This is very similar with the RegisterStartupScript() method. You only need to write the Java Script string and pass it as the second parameter in the method with a string key. Before I register the script, I added a conditional if statement, IsClientScriptBlockRegistered(string key). This is very essential calling this method to avoid unnecessary assembling of the client-side script.
IsClientScriptBlockRegistered (string key)
// key – the string key of the start up script to search for. This method will check
// whether the script is already registered or not.


Difference between RegisterStartUpScript and RegisterClientScriptBlock
As you can see from the above, two of the methods are very similar. The main difference between them is RegisterStartUpScript will embed the script BEFORE the CLOSING TAG of the page object’s < form runat=”server” > element, while RegisterClientBlockScript will embed the script AFTER the OPENING TAG of the page object’s < form runat = “server” > element.

Happy Programming!

Monday, October 22, 2007

DELETE FROM and TRUNCATE table functionality

There are two main commands used for deleting all the data from a table: TRUNCATE and DELETE FROM. Two of these achieve the same result; however there are significant differences between the two. There are advantages, limitations and consequences that you should consider to decide which one to use.

About TRUNCATE
 TRUNCATE command is faster because it removes all records in a table by deallocating the data pages used by the table, thus reduces the resource overhead of logging in the log and the number of acquired locks as well.

 It does not generate any UNDO information, does not fire DELETE triggers and does not record any information in the snapshot log.

 The only record of the truncation is the page deallocation, so the removed data cannot be restored.

 WHERE condition cannot be applied in TRUNCATE command.

 Auto commit and cannot roll back.

 It reset the IDENTITY value back to the SEED and the deallocated pages can be re-used immediately. If you want to retain the identity counter, use DELETE FROM command instead.

 This means if you have a table with an identity column and you have 20 rows with a seed value of 1, you last record will have the identity’s value as 20. After the table is truncated, the identity column will have the value of 1 when a new record is inserted. While for DELETE command, when a new record is inserted, the identity column will have a value of 21.

 This command cannot be used on tables that are referenced by foreign keys, or involved in replication or log shipping.

 If a TRUNCATE TABLE is issued against a table that are referenced by foreign key, an error is returned: Cannot truncate table ‘xxx’.


About DELETE FROM
 DELETE FROM command logging all rows in the transaction log, thus it consumes more database resources and locks.

 WHERE clause can be applied to narrow down the rows that need to be deleted.

 Not an auto commit and the removed data can be rolled back.

 To reset the IDENTITY value back to the seed, use DBCC CHECKIDENT command once you are done with the DELETE FROM command.

 When a table requires all records to be deleted and TRUNCATE command cannot be used due to against the rules, the following statement can be used to achieve the same result as TRUNCATE command:
DELETE FROM [table_name]
DBCC CHECKIDENT(“table_name”, RESEED, “reseed_value”)

Hope this article provides some clarify to you on this issue.

Sunday, October 21, 2007

Access Error: XXX DB can't append all the records in the append query

Currently I am working on a small project using MS Access Database. Since I am not so expert with the MS Access, it really brings me a lot of problems and spent me a lot of time too.

I tried to insert a new record into my database, but it kept came up with the message below

XX DB can't append all the records in the append query.

XX DB set 0 field(s) to Null due to a type conversion failure, and it didn't add 0 record(s) to the table due to key violations, 0 record(s) due to lock violations, and 1 record(s) due to validation rule violations.
Do you want to run the action query anyway?
To ignore the error(s) and run the query, click Yes.
For an explanation of the causes of the violations, click Help.


I tried to search online for the solution, but i can't find one. i tried to use .Execute method hope that it may give me a more meaningful error message. Finally i figured out what is the cause.

This error may happen if the field is Required, but no value is supplied.

It also can happen if the field's Allow Zero Length property is set to No, but you attempt to add a zero-length string instead of a Null. And there is a Validation Rule for the table (in the Properties box in the table design), as well as for the fields.

Hope this can help you.

Saturday, October 20, 2007

Request.ServerVariables (“LOGON_USER”) Error

Active Server Pages exposes an object called ServerVariables, which is part of the Request object. This ServerVariables object allows the programmer to see many environment variables. You can use the ServerVariables along with Internet Information Services (IIS)’s directory security options to determine who is currently accessing your site. You can also grab the visitor's IP address using the ServerVariables object.

In some .NET projects, when you try to access the Request.ServerVariables (“LOGON_USER”) variable in ASP .NET, it will return an empty string. This problem will occur due to the related authentication variables in the Server Variables list are not populated if you are using Anonymous Access Security to access the page. In the section of the Web.Config file, if you give the Anonymous user access, this problem will occur as well.

So how this problem can be solved?

There are two types of authentication mode which are Forms mode and Windows mode. To populate the LOGON_USER variable when you use any of the authentication mode other than none, you can deny access for Anonymous user in the section of the Web.Config file.

For authentication mode = “Forms”, use the following syntax in the Web.Config file.
< authorization >
< deny users = "?" > < !-- This denies access to the Anonymous user -- >
< allow users ="*" > < !-- This allows access to all users -- >
< /authorization >

If you are using Windows Authentication, go to Start > Run > Type inetmgr, this will bring IIS’s dialog box.

Expand Default Web Site and right click the Web Project folder, and then click Properties.

In the Properties dialog box, click the Directory Security tab, under the Anonymous access and authentication control, click Edit.

In the Authentication Methods dialog box, un-checked the Anonymous Access check box. Click OK for both dialog boxes. Close the IIS and does the testing again whether can get the value of LOGON_USER.

Hope this can help you work it out. Good luck.

Friday, October 19, 2007

A Simple Solution for Export ASP .NET Data Grid to Excel

This sample demonstrates an easy way to export DataGrid into an Excel file. Most of the web controls have a RenderControl method which will write an html text stream. All have to do is declare the response object, call RenderControl method and output the “rendering”. Quite simple!

Here is the code for the Export method:

Public Shared Sub ExportToExcel(ByVal dg As DataGrid, ByVal lblTitle As Label)
Try
If dg.Items.Count > 0 Then
HttpContext.Current.Response.Clear()
HttpContext.Current.Response.ContentType = "application/vnd.ms-excel"
HttpContext.Current.Response.AddHeader("content-disposition", "attachment;filename=" & lblTitle.Text & ".xls")

'Remove the charset from the Content-Type header
HttpContext.Current.Response.Charset = ""

Dim lbl As New System.Web.UI.WebControls.Label
lbl.Text = "<>"

'Turn off the view state
lbl.EnableViewState = False
dg.EnableViewState = False
Dim tw As New System.IO.StringWriter
Dim hw As New System.Web.UI.HtmlTextWriter(tw)

'Get the HTML for the control
lblTitle.EnableViewState = False
lblTitle.RenderControl(hw)
lbl.RenderControl(hw)
dg.RenderControl(hw)

'Write the HTML back to the browser
HttpContext.Current.Response.Write(tw.ToString())

'End the response
HttpContext.Current.Response.End()
End If
Catch ex As Exception
Console.WriteLine(ex.Message)
End Try
End Sub

This is really a simple solution. Hope it works out for you.

Thursday, October 18, 2007

Task Manager Had Been Disabled By Your Administrator

Yesterday, my friend called me for help because her computer has been infected by some kinds of spyware and caused an error – Task Manager being disabled.

If this happens normally you will need to edit the Windows Registry to fix it. Listed below you will find some ways to re-enable Task Manager.

Method 1 – Using Group Policy Editor in Windows XP Professional
1. Start > Run > gpedit.msc > OK.
2. Under User Configuration, expands the Administrative Templates.
3. Under Administrative Templates, expands System, then click on Ctrl+Alt+Delete Options.
4. Select Remove Task Manager from the list in the right-hand. Right click on it and select Properties. If this setting is enabled and users try to start Task Manager, a message appears explaining that a policy prevents the action. So by disabling the policy, you are enabling the Task Manager.
5. Click Setting. Select Disabled option and apply OK.


Method 2 – Change the Task Manager option through the Run time
1. Click Start, Run, and type the following command in the command prompt.

REG add HKCU\Software\Microsoft\Windows\CurrentVersion\Policies\System /v DisableTaskMgr /t REG_DWORD /d 0 /f

2. Click Enter.


Method 3 – Change Task Manager using a Registry REG file
1. Open a new Notepad file.
2. Copy and paste the information below into the Notepad and save it to your desktop as taskmanager.reg
Windows Registry Editor Version 5.00

[HKEY_CURRENT_USER\Software\Microsoft\Windows\CurrentVersion\Policies\System]
"DisableTaskMgr"=dword:00000000
3. Double click on the file to enter the information into the Windows Registry.


Method 4 – Delete the restriction in the registry manually
1. Click Start, Run, and type REGEDIT.
2. Press Enter.
3. Navigate to the following branch.
HKEY_CURRENT_USER \ Software \ Microsoft \ Windows \ CurrentVersion \ Policies\ System

4. From the list in the right-hand pane, find and delete the value named Disable TaskMgr.
5. Close the Registry Editor.


Method 5 – Download and Run FixTaskManager program
1. Click on this links and download the program FixTaskManager to your desktop.
2. Double click on it and run it.

Wednesday, October 17, 2007

How to Import Data from Excel File

This article provides a very simple example of how to query an Excel spreadsheet from an ASP.NET page using VB .NET. Check it out!

Sub Page_Load(sender As Object, e As EventArgs)
Dim ds As New DataSet()

Dim strConn As String = "Provider=Microsoft.Jet.OLEDB.4.0;" & _
"Data Source=C:\test.xls;" & _
"Extended Properties=""Excel 8.0;"""

Dim da As New OledbDataAdapter("SELECT * FROM [Sheet1$]", strConn)
da.TableMappings.Add("Table", "Excel")
da.Fill(ds)

DataGrid1.DataSource = ds.Tables(0).DefaultView
DataGrid1.DataBind()
End Sub

Good Luck!
 

Get paid for your opinions! Click on the banner above to join Planet Pulse. Its totally free to sign up, and you can earn UNLIMITED. Find out more by visiting PLANET PULSE.
Sign up for PayPal and start accepting credit card payments instantly. http://www.emailcashpro.com
July Code Blog Copyright © 2010 Blogger Template Designed by Bie Blogger Template